


How to Build a Lean-To Shed: A Simple Guide for DIY Enthusiasts
Hey there, fellow DIYers! So you're thinking about building a lean-to shed? Fantastic! It's a rewarding project that's surprisingly doable, even for beginners. This guide will walk you through the entire process, from planning to the final touches, in a way that's easy to understand and follow. Let's get started!1. Planning Your Lean-To Shed: Measure Twice, Cut Once (and then some!)
Before you even think about grabbing a hammer, you need a solid plan. This isn't rocket science, but a little forethought will save you headaches (and potentially materials) down the line.1.1 Determining Size and Location:
First things first: how big do you want your shed? Consider what you'll be storing. A small lean-to for gardening tools needs less space than one for storing lawnmowers and bicycles. Also, think about the location. You'll need a sturdy, level wall to lean your shed against. Is there sufficient sunlight for proper ventilation? Consider drainage as well. You don’t want a flooded shed.
1.2 Gathering Your Materials:
This is where a detailed list is your best friend. Don't just wing it! A trip to the hardware store mid-project because you forgot something is incredibly frustrating. You'll need:
- Pressure-treated lumber for the frame (consider 4x4 posts and 2x4s for the framing, depending on size and load-bearing requirements)
- Plywood or OSB for the walls and roof
- Roofing material (metal roofing is popular for lean-tos due to durability and ease of installation)
- Nails, screws, and a good quality hammer and drill
- Level, measuring tape, saw (circular saw is ideal, but a handsaw works too)
- Post hole diggers (if setting posts in the ground)
- Concrete mix (if setting posts in the ground)
- Optional: Window(s), door, paint or stain for added protection and aesthetics.
1.3 Permits and Regulations:
Check your local building codes and regulations. Depending on the size and location of your lean-to, you might need a permit. It's always better to be safe than sorry! Ignoring regulations could lead to fines or even having to tear down your shed.
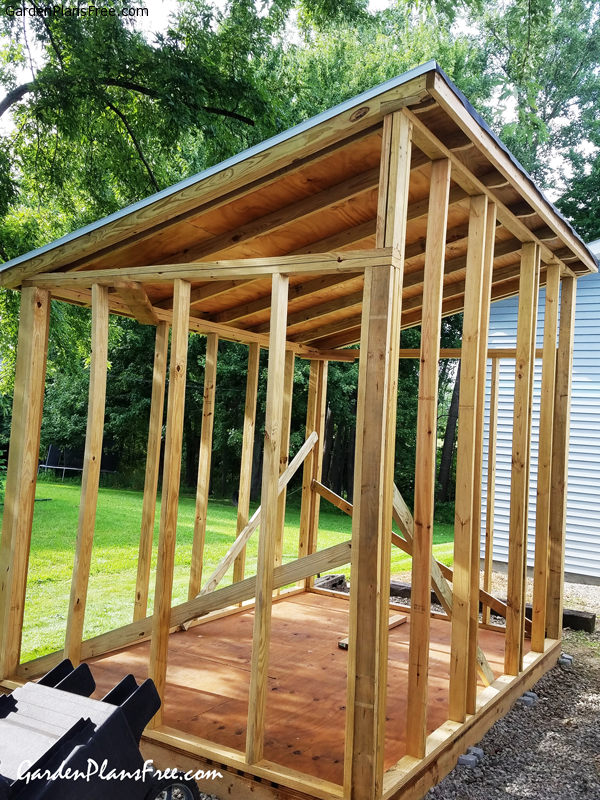
2. Building the Frame: The Foundation of Your Lean-To
With your materials gathered and your plan in hand, it's time to build the frame. This is the backbone of your shed, so take your time and ensure everything is square and level.
2.1 Preparing the Base:
If you’re attaching your lean-to directly to an existing structure, you'll need to create a strong connection. Consider using sturdy brackets and ensure a solid base to avoid any future problems. If setting posts in the ground, dig holes, set the posts, and fill with concrete, allowing it to cure fully before proceeding.
2.2 Constructing the Frame:
Using your 4x4's and 2x4's, construct the frame based on your measurements. Remember to check constantly with your level to ensure everything stays square. Start by building the sides, then connect them with the top and bottom framing members. It's like building a really simple rectangular box.
2.3 Attaching to the Existing Structure:
Carefully attach your lean-to frame to the existing structure, using strong brackets and screws. Ensure that the connection is robust enough to withstand wind and other weather conditions.
3. Sheathing and Roofing: Protecting Your Investment
Now that the frame is complete, it's time to add the sheathing and roofing. This protects your belongings from the elements and gives your shed a finished look.
3.1 Installing the Sheathing:
Attach your plywood or OSB sheathing to the frame, ensuring a tight fit. Use appropriate fasteners and ensure even spacing between the sheets. This forms the walls of your lean-to.
3.2 Adding the Roofing:
Roofing is where things get a bit more nuanced. Measure carefully and ensure your chosen roofing material is appropriate for the shed's size and anticipated weather conditions. Metal roofing is often easiest for lean-tos due to its lightweight nature and relatively easy installation. Remember to account for appropriate overhang for water runoff and protection. Use strong fasteners.
4. Finishing Touches: Adding the Extras
You've come this far; it's time to add the finishing touches to make your lean-to shed truly your own!
4.1 Doors and Windows:
If you planned on installing a door or windows, this is the time to do it. Follow manufacturer instructions, ensuring proper seals and framing.
4.2 Paint or Stain:
A coat of paint or stain adds protection from the elements and gives your shed a more polished look. Choose a weather-resistant product appropriate for your climate.
5. Safety First!
Throughout this entire process, remember safety! Always wear appropriate safety gear, including safety glasses and work gloves. Use caution with power tools, and never work alone on a project of this size. If you are uncomfortable with any part of the process, seek assistance from a more experienced DIYer.
Commonly Asked Questions
Q: How long does it take to build a lean-to shed?
A: The time it takes depends on your experience and the size of the shed. Expect to spend anywhere from a weekend to a couple of weeks, especially for beginners.
Q: How much does it cost to build a lean-to shed?
A: The cost varies greatly depending on the size, materials used, and any additional features. You can build a basic lean-to for a few hundred dollars, but more elaborate designs can cost significantly more.
Q: Do I need any special tools?
A: A circular saw, drill, level, and measuring tape are highly recommended. However, many of the tasks are achievable with hand tools if necessary.
Q: Can I build a lean-to shed against any wall?
A: No. The wall needs to be sturdy enough to support the weight of the shed. Avoid attaching to walls that are structurally unsound.
Q: What if I make a mistake?
A: Don't panic! Mistakes happen. Take a deep breath, assess the situation, and figure out the best way to correct the error. Sometimes it's as simple as removing a few screws and starting again.
Building a lean-to shed is a fantastic project that combines planning, skill, and a touch of creativity. With a little patience and attention to detail, you'll have a beautiful and functional addition to your property in no time. Happy building!


No comments:
Post a Comment
Note: Only a member of this blog may post a comment.