


Building a Weather-Resistant 6x8 Shed Roof: A Simple Guide
Building a sturdy and weather-resistant shed roof doesn't require advanced carpentry skills. This guide provides a simple, step-by-step approach to constructing a 6x8 shed roof, perfect for beginners. We'll focus on creating a reliable structure that can withstand various weather conditions. Get ready to build!
Planning Your 6x8 Shed Roof
Before you grab your tools, careful planning is crucial. This includes selecting appropriate materials, understanding the local building codes, and choosing a suitable roof design. A simple gable roof is ideal for a 6x8 shed due to its ease of construction and effective water runoff. Consider your budget and source high-quality lumber, roofing felt, and shingles to ensure longevity. Check your local building codes for permit requirements and any specific regulations regarding roof pitch and materials. Accurate measurements are essential â€" double-check all dimensions before cutting any lumber.
Essential Materials
Gather these materials before you begin:
- Pressure-treated 4x4 posts for the base
- Pressure-treated 2x4s for rafters and supports
- Plywood sheathing for the roof deck
- Roofing felt (underlayment)
- Asphalt shingles or other chosen roofing material
- Nails (various sizes)
- Building screws
- Level
- Measuring tape
- Saw (circular saw or hand saw)
- Hammer or nail gun
- Safety glasses and work gloves
Constructing the Roof Frame
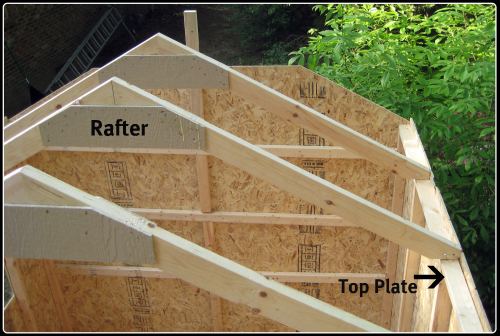
Begin by creating the roof's supporting structure. This involves assembling the rafters, which will support the roof deck. Ensure your shed walls are already constructed and plumb. Cut the rafters to the correct length, accounting for the desired roof pitch (a 4/12 pitch is a good starting point for a shed). Use a speed square or rafter square to accurately cut the angles for the rafter ends. Attach the rafters securely to the top plates of your shed walls, using appropriate nails or screws. Maintain consistent spacing between the rafters for even weight distribution.
Securing the Rafters
For added strength and stability, consider installing ridge boards at the peak of your roof and collar ties that connect opposite rafters. These will significantly reinforce the roof structure and prevent sagging over time. Make sure all connections are secure and firmly fastened to withstand wind and snow loads. A properly constructed frame is the foundation of a weather-resistant roof.
Installing the Roof Sheathing and Roofing
Once the rafter frame is complete and secure, install plywood sheathing over the rafters. This creates a solid base for your roofing material. Use appropriate nails to fasten the plywood securely, ensuring there are no gaps or loose sections. Next, apply the roofing felt (underlayment) over the plywood. This acts as a waterproof barrier, protecting the structure from moisture damage. Overlap the felt sheets to ensure complete coverage, and securely fasten them with staples or nails.
Laying the Shingles
Finally, install your chosen roofing material, whether asphalt shingles, metal roofing, or another type. Follow the manufacturer's instructions carefully for proper installation. Ensure consistent overlap between each shingle to prevent water penetration. Pay close attention to the roof edges and ensure proper flashing is installed to prevent water leakage around chimneys, vents, or other roof penetrations. Properly installed roofing is crucial for long-term protection from the elements.
Final Touches and Weatherproofing
After completing the roof installation, inspect the entire structure for any gaps or loose areas. Seal any cracks or gaps with appropriate caulking to prevent water infiltration. Consider adding additional weatherproofing measures, such as sealing around vents or installing gutter systems to direct water away from the shed's foundation. A final inspection will ensure the shed roof is weather-resistant and ready to withstand the elements.
Building your own shed roof is a rewarding experience. By following these simple steps and using quality materials, you can create a durable and weather-resistant structure for years to come. Remember to prioritize safety and take your time to ensure each step is done correctly.


No comments:
Post a Comment
Note: Only a member of this blog may post a comment.